
Enlightened Audio Education
Lesson 19
Finalising your recording and preparing for distribution
After following the instructions in the previous lesson, you’ve already taken steps to ensure that your recording is free from unwanted noises, you’ve balanced the relative volumes of your vocal track and the background music, and you’ve adjusted the master output volume.
Having done all that (congratulations for coming this far by the way), you are ready to merge your vocal track and the background music into one single, continuous audio file. This is the file that you will share with the world!
This process varies from one recording software program to the next but is often referred to as “exporting” or “bouncing” or “mix down”. There are three simple but important steps to consider when you export your recording.
1. File naming
When you export your recording, be sure to give it a suitable file name that will make sense to people who might download it. Name it after the title of your recording, for example “Deep Sleep Hypnosis.mp3” or “Journey to Inner Peace.mp3”. Don’t simply call it “meditation.mp3” or “my recording.mp3.”
2. File formats
Your sound recording program will allow you to export your recording in a number of different file formats. At first glance, these formats may be unfamiliar to you, but they are recognised standards that you will soon be comfy with. These formats should be readily available to you as options within your chosen sound recording software. The following information outlines which option to choose when the time comes to export your recording.
When exporting a file to burn to CD, choose a WAV file or AIFF file with a bit depth of 16 and a sample rate of 44.1 kHz. This is often represented in shorthand as “WAV 16 Bit / 44.1”. Just about every CD you’ve ever heard uses this high-quality file format.
Exporting a file for digital distribution, choose the MP3 format with a bit rate of 320 kbps (kilobits per second). This is the highest quality option for mp3 audio. If asked, use a bit depth of 16 bit.
3. Adding ID3 tags and album art
Important: You can skip this step if you only plan to release your recording in CD form or via music streaming apps like Spotify and Apple Music. This third step is only necessary if you wish to make your recording available for people to download via your own website. If this is what you plan to do, then you must ensure that your mp3 recording has been properly prepared for people to use on their computers and portable media players.
Take a look at the picture below and I’m sure you will be able to guess exactly where we are heading and why.
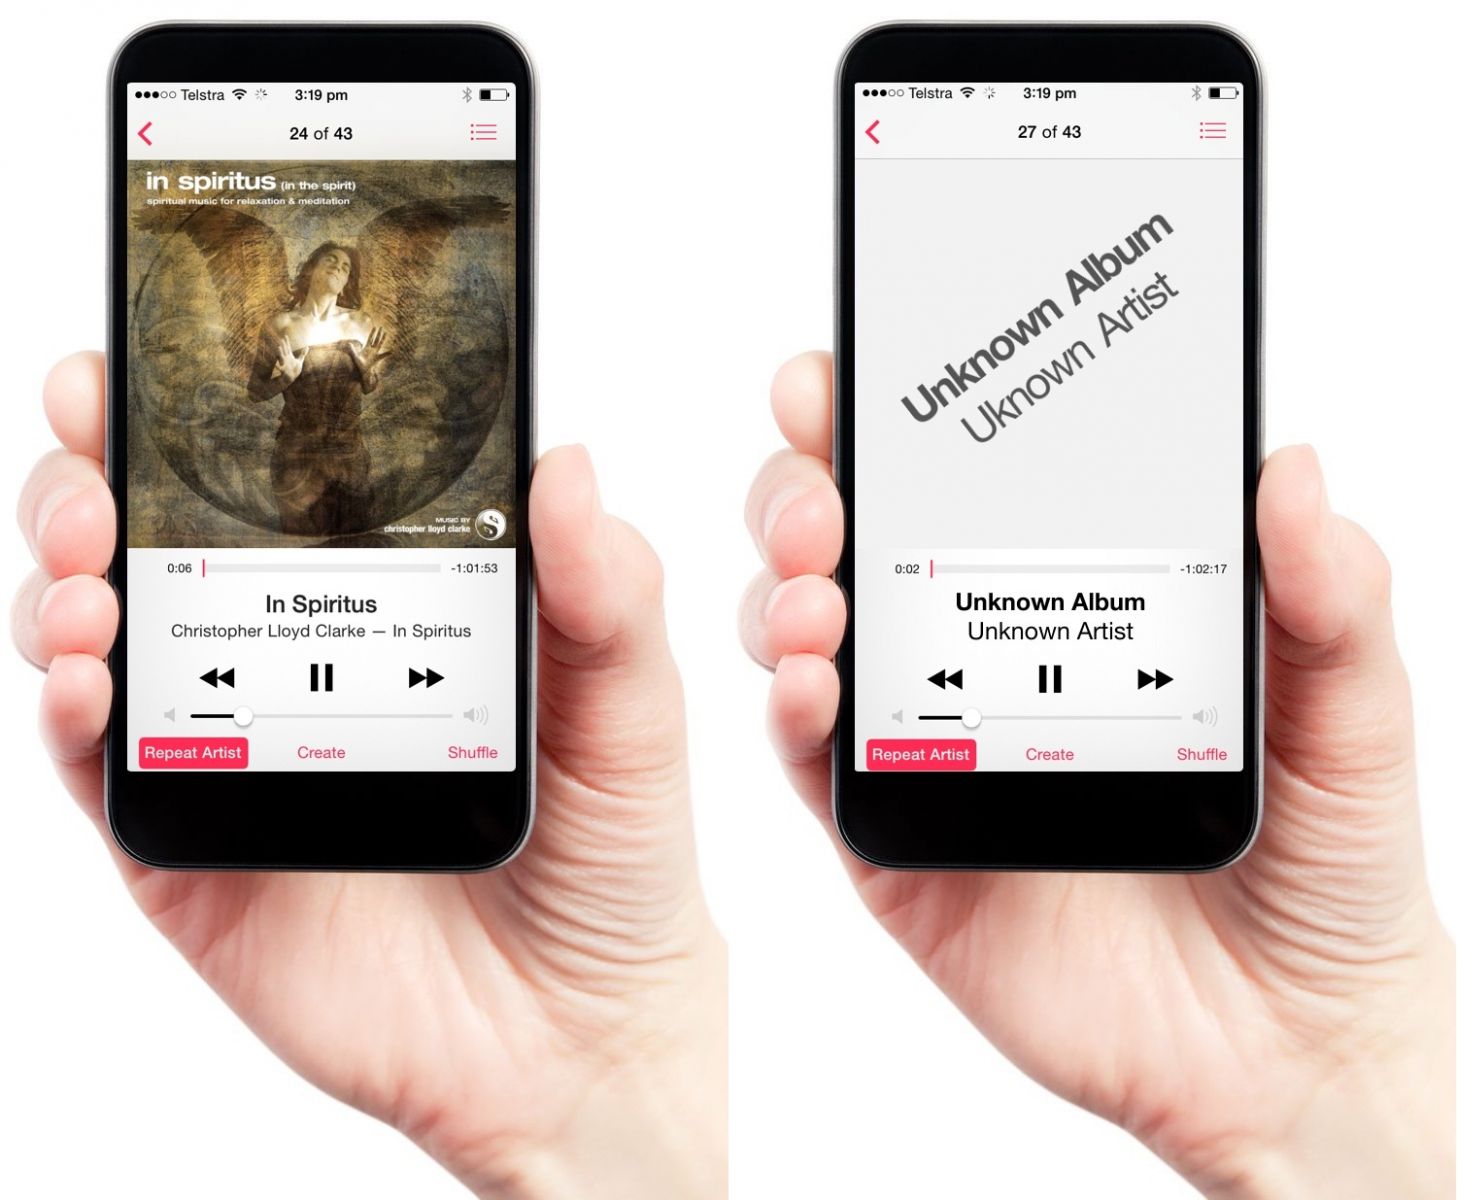
No prizes for guessing which one of these recordings has been properly prepared!
Adding ID3 tags
ID3 tags are snippets of information that you add to your mp3 file to make sure that people can organise and find your recording on their various playback devices. ID3 tags include elements such as:
- Album Name
- Artist (this is your name)
- Album Artist (this will be your name too)
- Track Names (the title for each of the tracks in your recording)
- Track Numbering (important for making your tracks appear in the right order)
- Composer (the name of the person who created the music you used)
- Year of publication
- Genre (oftentimes people use the default genre of “New Age Music”, but you can define your own genre, such as “Meditation” or “Hypnosis” for example).
If you don’t add tags to your mp3 file (an action we shall refer to as “tagging”), your recording will not show up properly in your customer’s media players. You want to make sure that your listeners can find your recording amidst the thousands of other albums and singles that they may have on their computer, iPhone, iPod, iPad, Android phone or tablet.
Tagging your mp3 files is easy, but the process varies from one sound recording program to another. For that reason, it’s not possible for me to provide step by step instructions for all of them, but here are two examples:
Adding ID3 tags in Audacity
The Metadata Tags Editor automatically appears for each exported file after you choose the file format in the Export Audio dialog. This allows you to add all the tags you need just prior to exporting your finished file.
Adding ID3 tags in Garageband
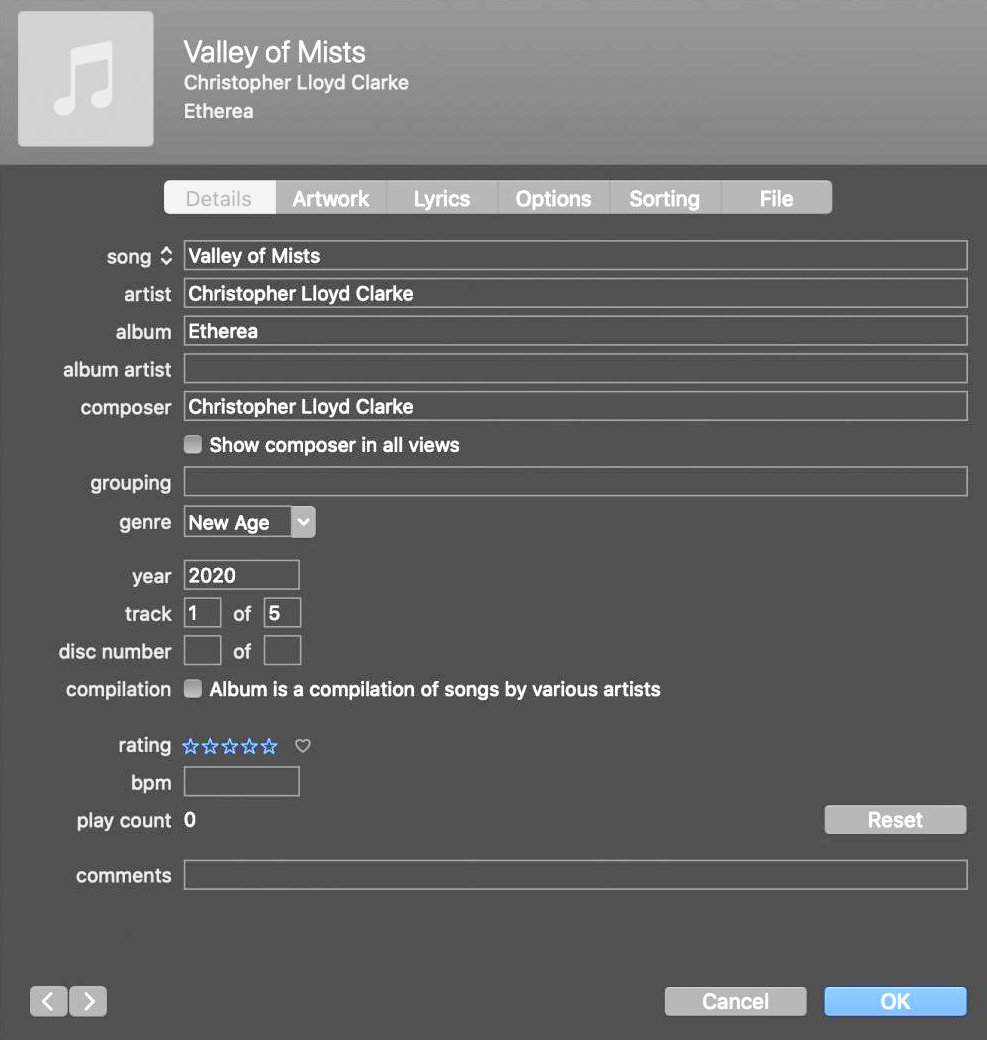
Unfortunately, Garageband does not include a tag editor, so the process of adding tags is a twofold process. Start by exporting your recording to create a finalised mp3 audio file. Then open the Apple Music program on your computer and add your mp3 file(s) to it. The simplest way to do this is to drag and drop your mp3 file directly into your music library. Alternatively, click on “File” in the top menu, and then select “Add file to library”. Locate your recording in your Apple Music Library, right click (control-click) on it and select “Get Album Info”. This will bring up a window that allows you to edit the information for the mp3 files in your recording, see screenshot example.
4. Adding the album cover art to your mp3 file
We have not yet discussed how to create album artwork, but we will dive into that in the next lesson. For now, let’s simply walk through the process of adding album artwork to your mp3 file.
Most sound recording programs don’t allow you to add album art to your recording. This final step is something you will do inside a media player program on your computer. For Mac users, this will be Apple Music, for Windows users, simply use Windows Media player.
Adding album art with Apple Music
In the same window that you use to edit your recording’s ID3 tags, click the tab labelled “Artwork”. Then click on the button labelled “Get Artwork”. This will open a new window that will allow you to explore the files on your computer. Navigate to the location on your computer that holds the artwork for this album and select it.
Your album will now display correctly in Apple Music. You should be able to see the album image, the name of your album, the track names and your name too. If there are multiple tracks in your album, then make sure they are showing up in the right order.
Adding album art with Windows Media Player
After adding your mp3 file to Windows Media Player, locate your recording in your music library. Right-click the album art area and then select “Paste Album Art” from the drop-down menu. Navigate to the location on your computer that holds the artwork for this album and select it.
After adding artwork to your recording, you will now have two copies of your recording on your computer.
1. The original MP3 files that you exported from your audio recording software before you added album artwork. They should still be residing on your computer in their original location. These MP3 files will not be tagged and will not include album artwork.
2. A second copy of your mp3 files, fully tagged and displaying album artwork, now also resides in your Music library. These are the files that you want to use when the time comes to share your recording with others.
Tip:To keep things neat and tidy, this is what I recommend:
Open the folder on your computer where your original files are located and delete them. Leave that folder open while you return to your music library. Now drag a copy of your freshly tagged album from Apple Music back into the empty folder where your original files used to be.
By doing this, you completely replace the original files with the new, fully prepared files. You now have just one copy of your MP3 files, so there’s no chance of you accidentally sharing the wrong ones.
Your files are now ready to sell on your own website
Once your artwork and ID3 tags have been added to your recording, you are ready to distribute it on your website! When other people download your recording to their computer and add it to their favourite media player, it will display correctly. In addition to this, users will be able to search for your recording by album name or by your name, and if your album contains multiple tracks, then they will all play in the correct order.