
Enlightened Audio Education
Lesson 18
How to edit your meditation or hypnosis recording for a polished and relaxing result
Have you already listened to our “Tuning in to Sound Quality” tutorial? If so, your training is about to pay off. It’s listening time. Critical listening time.
Critical listening – Step 1
Play back your voice recording without any accompanying music from beginning to end, listening closely all the while. Keep your ears peeled for any of the following problems:
1. Momentary noises
Momentary noises are short, intermittent noises like dogs barking, plosives, your chair creaking, paper rustling, tummy gurgles. Momentary noises that occur in the spaces between words and phrases can probably be muted or cut away using simple editing tools. Momentary noises that take place in the middle of words are more problematic and can usually only be solved by re-recording the affected section.
TIP: Never try to re-record and replace a single word, even if the offending noise only affects one word. Re-record the entire sentence around that word, or even an entire paragraph if you like. This is essential to keeping the flow of your spoken word performance intact (something that’s particularly important in hypnosis and meditation recordings).
2. Persistent environmental noises
Persistent noises (often referred to as “stationary noises”) include sounds like the humming of mechanical equipment, wind or rain, the rumbling of distant traffic and so on.
Never has the saying “prevention is better than a cure” been more appropriate. Persistent noises can be very troublesome to remove, so the best way to avoid them is to only record at times when persistent noises are not present. In other words, if the rain is belting down on the tin roof above you or if the sound of howling wind can be heard in your recording room, console yourself with a cup of hot chocolate and save your recording for another day.
In some cases persistent noise can be removed from a recording. For example, very low frequencies (rumbling sounds) can often be filtered from your voice recording using simple editing tools found in most sound recording software. Editing tools for removing low rumbling sounds usually have names like “Low cut filter”, “High pass filter” or you can use a simple equaliser to remove the very lowest bass frequencies.
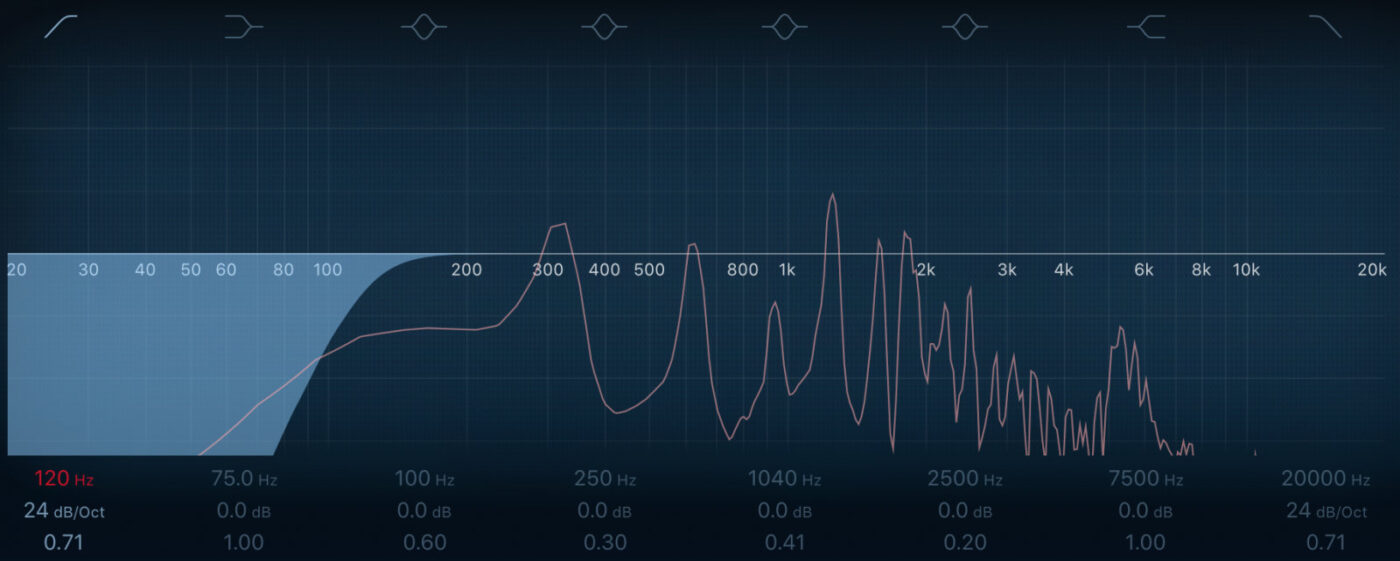
An example of an equaliser being used on a female voice recording. In this case low frequencies below 120 hz are being removed.
Persistent high frequency sounds, or broad-band sounds (hissing and white noise sounds) are very difficult to remove without the right software and expertise. With that in mind, I’d like to caution you against using any noise reduction effects that your sound recording software might include. In my experience, the noise reduction effects offered by many recording programs are average at best and can actually degrade the quality of your voice recording unless used sparingly.
However, high quality noise reduction software is available. I personally use Izotope’s RX program, which can achieve almost magical results, but it’s not cheap and requires some skill to use properly.
Conclusion? Prevention is better than a cure. Enough said!
Critical listening and mixing – Step 2
Once you are satisfied with the quality of your voice recording, it’s time to introduce your chosen background music and assess the overall pace and flow of your recording.
Adding music to your project is usually a simple “drag and drop” function for most recording software programs like Garageband and Audacity. Open the folder of your computer that contains your chosen background music and simply drag it into the main window of your project.
Now you should be able to play back your recording, whilst listening to your background music at the same time. Are you ready to start mixing? Great! Here’s what comes next:
1. Balance the volume levels
Adjust the volume of the music until it feels comfortably balanced with the volume of your vocal track. There’s plenty of wiggle room here and no specific volume level “standard” that you need to achieve, but if you are feeling uncertain about your volume balance, then I have a couple of suggestions for you…
Firstly, listen to your recording at a relatively quiet volume while assessing the volume balance. You are creating a hypnosis or meditation recording that your listeners will play at a fairly quiet volume, so it makes sense to simulate those same conditions when reviewing how your recording sounds.
Secondly, if you find yourself fiddling indecisively with the volume of the music – a little louder, a little quieter, a little louder again – then err on the side of quieter and leave it at that.
2. Adjust the timing of your performance
Now that you’ve balanced the volume of your voice and the music, listen to your entire recording once again and as you do so, contemplate the pace and timing of your vocal performance.
This is an important step!
Listen to it with your eyes closed and experience your recording as if you were a client listening to it for the first time. If that means going into a hypnotic/meditative state, then go there.
As a professional therapist or healer, you no doubt have plenty of experience with meditative and/or hypnotic states of consciousness, so bring that experience to bear on this part of the production process. Listening in a deeply relaxed state will give you a fresh perspective on how your recording comes across – a perspective that is more closely aligned with what other people will experience when they listen to your recording. Subsequent adjustments to your recording, if they are required, will lead to a finished result that is even more attuned to their needs.
Your performance might be spot on and need no adjustment whatsoever, but sometimes you might feel that you rushed some passages or perhaps you left too much silent space between some parts.
Remember that you can snip your vocal recording into as many parts as you like, opening up space between some parts and closing it up in others. Now is the time to make those changes, but only if you feel they are necessary.
SANITY SAVING TIP: Don’t get mentally bogged down in this particular step. Again – there’s lots of wiggle room, so if you find yourself obsessing over the timing of any particular part and making tiny corrections here and there, take a five-minute break, have a laugh and take a more relaxed approach to this step when you return. I talk a lot about maintaining a high-quality standard in this course, but the timing of your performance is one area where I’m happy to report that “close enough IS good enough”.
3. Apply fades to the music
At the conclusion of your recording, you will probably need to fade out the music (and you may need to fade it in at the start too). Fades are simply volume changes that take place over time and while the procedure for applying them varies from one recording program to the next, they are such a simple and commonplace editing function that you should have little trouble mastering them.
TIPS for the conclusion of your relaxing recording
If you want your listeners to be alert and awake at the conclusion of your recording (in other words, if you want to lead them out of a deep state of relaxation and into full wakefulness), then fade out the music shortly after you finish speaking. A short fade of anything between 10 – 30 seconds will suffice.
You might also like to consider transitioning to a slightly more lively piece of ambient music during those final moments in which you conclude the journey and welcome your listener back to the real world. Most therapists don’t bother to do this and it’s certainly not a necessity, but it can be a really nice touch.
If you want your listeners to remain in a deep state of relaxation (or fall asleep) after you finish speaking, then consider letting the music play on by itself for a little while. Allowing the music to play on for an additional 2 to 10 minutes will give the listener the chance to fall even deeper into that lovely state of relaxation. When the time comes to fade out the music, I recommend extremely slow fades that last for up to a minute or more, so that the transition to silence is very gradual and gentle.

Critical listening and mixing – Step 3
Adjust the overall output volume of your recording
Your recording is a combination of at least two sound sources: your vocal recording plus the background music. You might have even added more sound sources to your recording, like nature sounds for example. Moments ago, in Step 1, you balanced the volume of these sound sources relative to each other. Now it’s time to ensure that the combined volume of all these sources is set to the correct level.
All sound recording programs have a “master output” or “main output” level meter. This is the level meter you need to pay attention to at this point.
Your task is to find the loudest moment in your recording and then adjust the main output level until the loudest moment peaks no higher than 1 decibel below the maximum allowable volume. This maximum volume is usually referenced as 0 db.
When it comes to hypnosis and meditative recordings there is a little bit of room for error here. Aim for a peak level anywhere between -3 and -1 db of maximum. That might seem like quite a narrow window to aim for, but your main output level meter should make this visually apparent to you. An example is shown below.
In the image you can see an example of a two track recording being mixed. In this screenshot the music track is on the left, followed by the voice track. The combined volume of these two tracks is displayed as the Stereo Output volume, which in this moment is peaking at -1 db below maximum.

Don’t let it get too loud
Obviously, the volume of your recording will vary over time – that’s completely normal, but you should aim to keep it at or below -1db. It must never go so far “into the red” that it goes beyond the maximum “0db” level. If it does, your recording may be audibly distorted in that moment.
Don’t let it get too quiet
If at its loudest point, your recording is still quieter than -3 db below maximum, it will probably sound noticeably quieter than other comparable recordings. Your listeners will end up compensating for this by turning up the volume on their stereo and will probably wonder why your recording is quieter than everything else in their collection.
The benefits of using “limiters”
Many recording programs come with a handy editing feature called a “limiter”. Limiters are a fantastic tool (and a staple amongst professional audio engineers) that will protect your recording from clipping distortion. Limiters allow you to gradually raise the level of your recording until it approaches the maximum allowable volume, then if a peak in your recording looks like it will exceed this maximum level, the limiter steps in and compensates for this by reducing the volume for a split second. In essence, limiters are like a volume “brick wall”. They will save you from having to watch your level meters like a hawk and will help you to safely raise the level of your recording so that it peaks where you want it to peak.
TIP: Garageband and Audacity both include a free limiting tool. In Audacity it is called a “Hard Limiter” and in Garageband it is called a “Peak Limiter”.
Professional recording studios and mastering engineers often go to great lengths to maximize the average volume of music productions. Their efforts in this regard are the result of a competitive approach to mastering known as “the loudness wars”. But you’re not mixing a band or recording a dance music production. You’re creating a relaxing audio production and so maximizing loudness is not crucial. However, it’s still important that your recording peaks at an appropriate level and does not become so loud that it exceeds -1 db. Limiters make this process easier, but you can live without them if you are prepared to keep a watchful eye on your master levels prior to finalizing your recording.
Speaking of which, finalizing your recording is your next step.