
Enlightened Audio Education
Lesson 17
An overview of the recording process
In this lesson we will walk through the steps involved in recording your voice to your computer. Later on, we will explore essential editing and mixing techniques, like adding music and applying volume fades.
Please note…
The instructions in this lesson are only designed to provide you with a general overview of the recording process. There are many different recording programs available to you and they all work a little differently, so it’s not possible for me to provide step by step instructions that would apply to them all. But despite those differences, all recording programs have certain features in common and they all require a similar approach so we can easily cover the most important steps.
Should you become stuck at any point in the recording process (and if you are loath to read the instruction manual for your chosen recording program), my advice is that you look up tutorial videos on YouTube (these are probably the best way to learn) or visit a user forum to request assistance. There are forums for just about every recording program in existence and loads of fellow users out there who are willing to help you.
The forums for Audacity and Garageband can be found here:
https://forum.audacityteam.org
https://discussions.apple.com/community/ilife/garageband
A quick overview of the recording process:
Step 1. Connect your microphone
Connect your microphone to your computer and launch your sound recording program. Make sure that your pop filter is in place and that your microphone is firmly resting in its stand.
Step 2. Set your recording preferences
Adjust the preferences in your chosen recording software to record in the following file formats and quality standards:
File format: WAV or AIFF
Bit depth: Choose either 16 bit or 24 bit. Avoid any settings higher or lower than this.
16 bit is a high-quality setting that is equivalent to CD quality audio. 24 bit is an even higher quality setting that is commonly used by professional recording studios. The only downside to 24-bit audio is that it will use up 50% more hard disk space than 16-bit audio.
To be honest, 99.9% of people won’t notice any difference between 16-bit audio or 24-bit audio, so feel free to use the 16-bit setting in your recordings if disk space is a concern. If you have disk space to spare, as most people do these days, then feel free to use 24-bit audio to create a “super high quality” master copy of your voice recording.
Sample rate: 44.1 kHz is a common standard and is used for all CD quality audio. A higher sample rate of 48 kHz is also commonly used by professional recording studios. Higher sample rates may also be available to you, such as 88.2 kHz or 96 kHz, but they will use a lot more hard disk space and will not yield noticeable quality improvements.
Step 3. Check your levels
All sound recording programs have “level meters” that allow you to monitor the sound level that your microphone is capturing. Note that I am not talking about the volume of the sound coming out of your speakers, I’m talking about the volume of the sound that’s going from your microphone into your computer.
One of the most common mistakes that people make when recording their voice is recording either too quietly or too loudly. It’s essential that your recording signal is reasonably strong but does not exceed the maximum volume allowed by your recording software (a problem that results in distortion known as “digital clipping”, which sounds really nasty).
If you record your voice too quietly, then you’ll find yourself compensating for this by boosting its volume after it has been recorded. This can cause an excess of hiss or other unwanted noises to sneak into your recording.
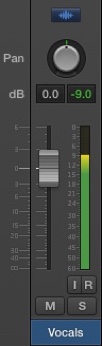
Figure 1.
A level meter in action, peaking at -9.0 decibels.
Do some test recordings of yourself speaking and keep your eye on the level meter in your recording software. At the loudest point in your recording that level meter should peak no higher than 5-10 decibels (db) below the maximum allowable volume.
Figure 1. displays what a typical level meter looks like. The coloured bar is a measure of the incoming volume of the vocal track. In this example it has peaked at 9db below maximum.
Step 4. Let’s start recording!
Get comfortable, hit the record button on your recording program and start reciting your script. Remember, you don’t have to get it all right the first time. Lots of people get a little stage fright the moment that little red record button is pressed, but there’s no need for worry. You can record yourself as many times as you need to get it sounding right, so there’s absolutely no pressure to perform.
Keep in mind that your recording does not have to be one perfect, continuous performance. Your sound recording software will allow you to snip your recording into parts that you can move around, delete and replace if necessary. In the same way that word processors allow you to cut, copy, paste and move sentences on a page, your recording software will allow you to do all this with the audio you record. This means that if one particular word or phrase in your recording sounds “off” for any reason, you can just delete that one section, re-record a new part and move it into place.
If your levels were set correctly, then you should have a healthy looking waveform on display in your recording software. It might look something like this:
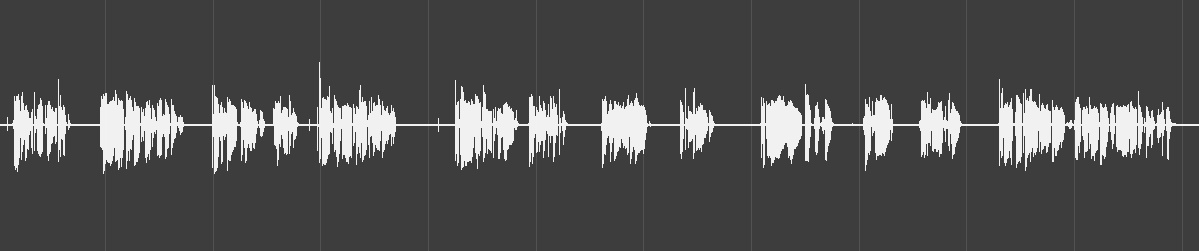
Figure 2. A well recorded vocal take.
In the example above, one minute of voice recording is displayed. The following two examples provide visual examples of audio that was recorded too quietly and too loudly.
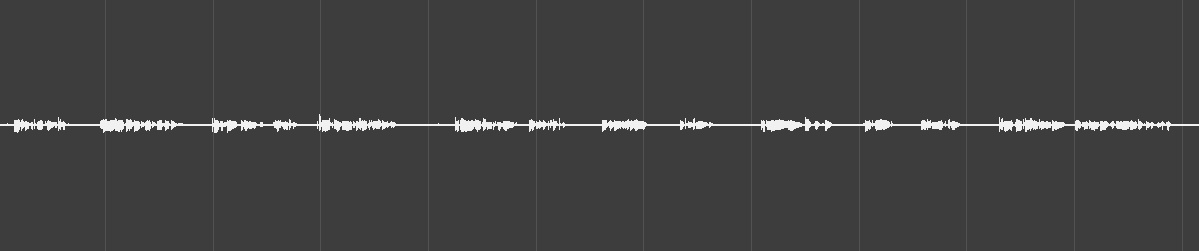
Figure 3. A voice recording that is too quiet.
The rather anaemic waveform on display in Figure 3. is the result of a microphone that was not sending a strong enough signal to the computer.
In Figure 4. below we see an example of a recording that was way too loud. Notice how the waveform is literally cut off at the top and the bottom (clipping), resulting in a nasty distorted sound. This will only happen if your microphone input volume is too high.
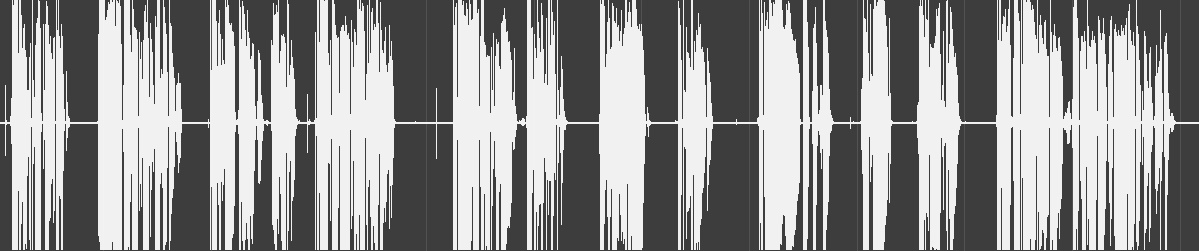
Figure 4. Digital clipping.
Take your time
We covered just four essential steps in this lesson. Those four steps are fairly straightforward and will be common to most sound recording programs, however if you have never used such a program before, then you might find that it takes a little time and a little trial and error to master them. So, take a relaxed approach and be willing to make some mistakes the first time around. Once you’ve got these steps figured out, you’ll find recording to be a very easy process.